How to make an electronic cigarette or box mod with your own hands. Two types of electronic cigarettes that you can make yourself. Appearance of sleeve mods with installed atomizers
is a device that imitates the process of regular smoking, but relieves the smoker from inhaling tar and other combustion products, and it also allows you to change the dosage of nicotine.
An electronic cigarette is a tube, slightly longer than a regular cigarette, consisting of a battery, an evaporator, a microprocessor that controls the evaporation process, and cartridges with an aromatic liquid - usually a mixture of nicotine and propylene glycol. The tip of the cigarette lights up during a puff as the smoker inhales the “smoke.”
Two options for a homemade battery pack for an electronic cigarette are presented below.
Option I. Gilzomod
To make it you will need:
- Brass cartridge case from a 12 gauge hunting rifle (sold in a hunting store without presenting a hunting license)
- Plastic cartridge case from a 12 gauge hunting rifle with a long skirt (32 mm)
- 510 connector with nut
- Button - any small one (I used a button from an old monitor board)
- Contact spring from any battery compartment (flashlight, electronic watch, children's toy, etc.)
- Transistor type IRLB 3034, IRL3103, IRF3107, IRl3803, IRF1404, IRFR3706, IRLR7833, IRLS4030pbf, IRLB3036PbF which you can find in a radio store (I used IRL3103).

Description of work
Case preparation
We put the brass sleeve aside, it will only be needed when completing the assembly of the sleeve mod, and we put the plastic sleeve in a saucepan with water, put it on gas, and boil for 15-20 minutes. Then use pliers to pull out the plastic part from the sleeve skirt. It should look like this:

In the sleeve skirt, we drill two holes for a 510 connector with a diameter of 9 mm at the end of the sleeve, and on the side for a button. In my case, the hole for the button is 3.5 mm.

I secured the button inside the sleeve using soldering, and also immediately soldered one of the button contacts to the inner surface of the sleeve.
I screwed a 510 connector into the end of the sleeve.
Button attachment
Now let's prepare for installing the transistor; it is necessary to protect the button from the effects of high currents from the battery pack.

Preparing the transistor
The transistor's attachment plate to the radiator is ground off to reduce its size, and a resistor with a resistance of 10-15 kOhm is soldered on (I set it to 11 kOhm).

To install it in the sleeve, the transistor is ground like this:

Sleeve mod design

The schematic diagram of the sleeve mod looks like this:
Schematic diagram of the sleeve mod

The brass sleeve is the common positive wire of the sleeve module.

The sleeve mod is ready, assemble it, insert an 18650 battery into the brass sleeve (I use batteries from a dismantled laptop battery), The battery is inserted minus side up!
Assembly


Polishing
Gilzomod is ready for work, the only thing that is advisable to do is to improve the appearance a little.
I polished the assembled mod with this device - a cut cotton swab placed on the electric motor shaft and greased with GOI paste.

At the end of all the work, the assembled sleeve mods look like this:
Appearance of sleeve mods with installed atomizers

Sea trials showed excellent performance of the sleeve mod on a 0.5 Ohm 0.4 kanthal winding.
Option II. Boxmod
Battery pack for an electronic cigarette from a Chinese PowerBank.
Fortunately, the PowerBank case has space to install everything you need.
USB 5V Mobile Power Bank

I used a 510 connector from a cigarette like this, which had been lying around for a long time.

The connector was soldered into a rectangular piece of foil PCB with a drilled hole, and secured to the body using hot-melt adhesive, and a locking button was also installed on the body.
Housing with installed button and 510 connector

Battery pack diagram

Mofset transistor K3918 fell out of a faulty motherboard, there are several of them in the processor area, the batteries were used from a faulty netbook battery, any button can be used.
The installation was carried out with a 1mm single-core copper wire, the transistor was soldered directly to a piece of foil PCB on which the connector is attached.
Battery Pack Installation

In general, the assembled battery pack looks like this

Appearance with a screwed-on atomizer.

The box mod works great, and the batteries can be charged without removing them from the case via the miniUsb connector.

Electronic cigarette ecigarette is the latest invention designed to help smokers from all countries quit the bad habit without quitting!
An electronic cigarette allows you to control the physical dependence on smoking due to the use of cartridges with different contents of purified nicotine and the psychological one, due to the fact that the process of using Cigarette Electronic accurately imitates the classic way of smoking a regular cigarette.
(Used materials from the site: fototank.ru-
The question itself: “how to make an electronic cigarette?” not particularly difficult. You can easily verify this by reading our article to the end. If you are not a supporter of DIY crafts, then after studying this material, (at least) you will know what the “electronics” consist of and how they are repaired in workshops. There are other advantages that we will also consider immediately before the instructions.
Advantages
- Despite the fact that most devices are not so expensive, they are still not affordable for everyone. Plus, it’s worth considering that the cost of any original/branded product includes warranty service and other extra charges. From which there is no escape. That is why, making electronic cigarettes with your own hands, as an option (in a quiet home environment), is profitable. Moreover, this process is not so complicated.
- Quite “tricky” (branded) parts, batteries (and chargers for them) very often break down (due to “economical” Chinese production). And this is where the problems begin. Firstly, they are not cheap, but that doesn’t matter. And secondly, it’s difficult to get them (especially if the device has already been discontinued). Therefore, one of the main advantages of all self-made devices is the absolute availability and low cost of all spare parts.
- Most people don’t even look for answers to the question: how to make an electronic cigarette with your own hands? It is easier to buy a ready-made device. But experienced vapers (especially foreign fans) sometimes have a completely different opinion. Indeed, in this case, you can not only understand the intricacies of your favorite device and the mechanism of its action (i.e., learn the whole process “from the inside”), but also create a masterpiece “tailored” to your personal preferences. The envy of all your friends! Don't believe me? Read foreign articles on this topic.
Example: how foreigners make electronic cigarettes (with their own hands)!
Precautionary measures
As practice has shown, the most dangerous thing in making electronic cigarettes yourself is a rash idea - to create a flavored liquid at home. Therefore, if you do not have a good education as a chemist, then do not even try to do something. This is fraught not only with facial burns (at best), but also with serious damage to the respiratory tract (including not only burns, but also dangerous diseases). Today you will save money, and tomorrow you will spend 10 times more on treatment (at least).
So, how to make a homemade electronic cigarette?
What will we need for this exciting event?
- 3 “D” batteries or 4 pcs. type "C".
- Hollow cardboard tube.
- Black electrical tape (it is much better than blue in terms of “stickiness”).
- Wire (any metal except aluminum).
- Alligator clip.
- Big scissors.
- Regular pliers or pliers.
- And, of course, the electronic cigarette cartridge itself.
Practical guide - DIY cigarette
We bring to your attention step-by-step detailed instructions (with pictures) on how to make a homemade electronic cigarette (i.e., with your own hands) in normal home conditions.
#1 Buy batteries, look for the right wire

The best option: 3 batteries of “D” format or 4 pieces of “C” (as indicated in the picture above). An important point: the insulated wire (not aluminum) should be a few centimeters longer in length (3-4 cm is enough) than the length of the batteries laid out in series.
#2 Carefully prepare the wire

Using pliers, remove the insulating coating from both ends of the wire. At one end 2-2.5 cm, at the other 7-7.5 cm. If the wire is of a twisted type, then you just need to straighten it with your hands.
#3 Making a contact spiral

How to do it? From the longer (7-7.5 cm) bare end of the wire, we create a spiral (as shown in the image above). Bend it, perpendicular to the direction of the wire itself. On the other, shorter end (2-2.5 cm), we attach a “crocodile” (i.e., a special form of clamp).
#4 Installation of the spiral on the lower battery

With our own hands we make the “connection” of the previously created spiral to the “minus” of the lowest battery in the circuit. Next, we “glue” it properly using electrical tape (necessarily black - good “sticky”, and not blue).
#5 Create the device body

For this task, we need a regular cardboard tube (you can buy it at a hardware store - plumbing section). There is another option for choosing the material, which can be seen in the video below “how to make an electronic cigarette from a wide pen.”
But we'll get back to the tube. So, cut it along the entire length. This is necessary so that the batteries fit inside it without unnecessary free space/play.
For the bottom hole of the tube, make a round plug/cap, then glue it. Secure the outer part of the tube with strong rubber bands (5-6 pcs.)
#6 Insert batteries into the case

We perform the following list of actions. First, we “lower” the lowest battery of the circuit into the tube (at the bottom of which the spiral is fixed). Next, add the remaining batteries one by one (- / + / - / + / - / + / - / +). The part of the wire with the alligator clip must “peek out” from the top of the housing.
#7 Manipulating the cartridge plug

If your cartridge already has a normal plug, then with a feeling of relief, you can safely skip this step of the instructions.
If you are less fortunate, then we “turn on” creative thinking and create a homemade plug. For this purpose, we use a screw (or nail), which we carefully and beautifully wrap with electrical tape. Ready!
Next, from a small piece (for example, lying around in a toolbox) of sheet metal, we cut out the letter “T” and bend it around our (recently improvised) “plug”. How this looks in practice can be seen in the image above.
#8 Collect and use!

Now the final moment has come for assembling a homemade electronic cigarette. In order for it to be ready “for battle,” touch the “plug” (i.e., the former screw) to the positive pole of the topmost battery. Immediately, a characteristic hissing sound will be heard. After vaping, be sure to disconnect this contact (otherwise the cartridge will overheat).
Also, make sure that the crocodile does not accidentally touch the batteries - this can lead to a short circuit. In general, try to secure the device normally: bend the wire (away from the contacts) If necessary, make another letter “T” (with wider “wings”) so that the crocodile is further away from the contact. That's basically all you need to know.
Video - making an electronic cigarette from a pen
The idea of creating an electronic cigarette has been around for a long time, but only after some time I finally decided to create this thing. Buying a ready-made cigar somehow affected the amateur radio self-awareness, so I took on the development of the project myself. Here's what she can do:
- on/off with one tact button
- sound notification when power on/off
- It is not possible to turn on the coils at the battery threshold value
- LED indication of battery status and discharge status
- sound signal when battery is discharged
- setting the battery threshold in 0.1 Volt increments
- There are 7 color schemes
- The screen goes blank after about 15 seconds when the menu buttons are inactive
- has a settings menu
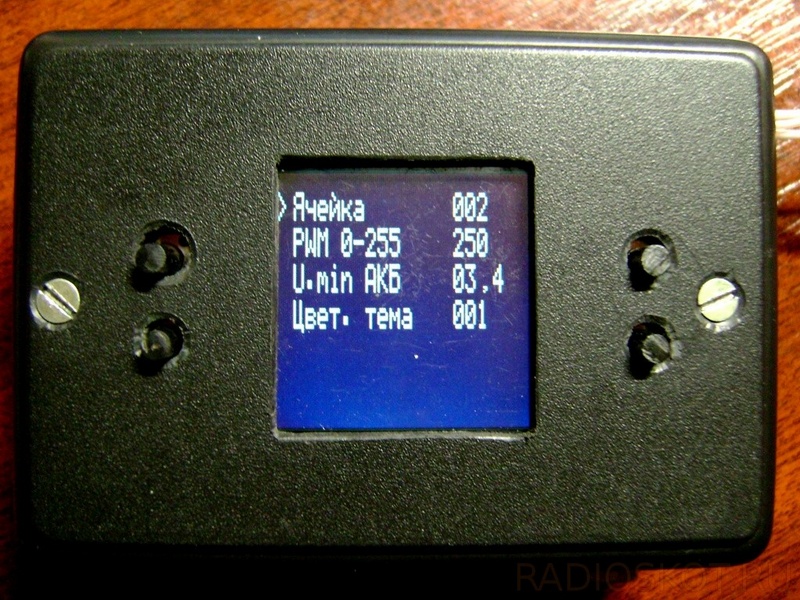
Display indication:
- memory cell number from 1 to 10
- Filling PWM for a specific memory cell from 0 to 255 in steps of 1
- current battery voltage
- minimum set battery cut-off voltage
- There are only 7 colors
First I decided what I was going to soar with. I would like to vape with both an atomizer and a dripper, so the controls should be universal.
The case will contain two 18650 25R batteries and the actual circuit board of the cigarette with parts.
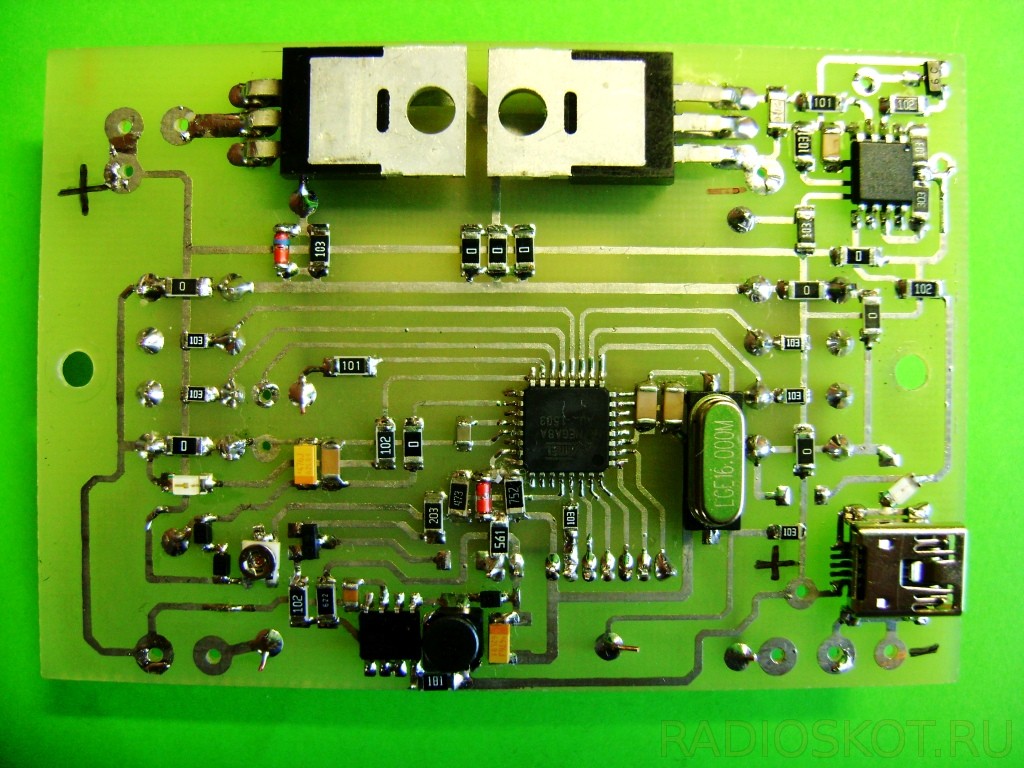
Power switches are designed for significant current and it is possible to connect to the mod both simple atomizers and drips with a different number of coils and their resistance. Thanks to the presence of PWM adjustment, it is possible to adjust it to a specific winding option and the number of coils, so as not to swallow fumes.
The calculated long-term power output is about 150 Watts, which is of course a lot, but there should be potential. The five-second output power is about 370 Watts, to be honest this is useless, but the potential is also there.

I push it into the case, the extra 0.2 mm in height does not allow the “suitcase” to close tightly.
In work, the adapter for the drip tip is made of stainless steel, since there is catastrophically little space, the adapter is planned as one piece with the drip tip and having a 510 connector inside.
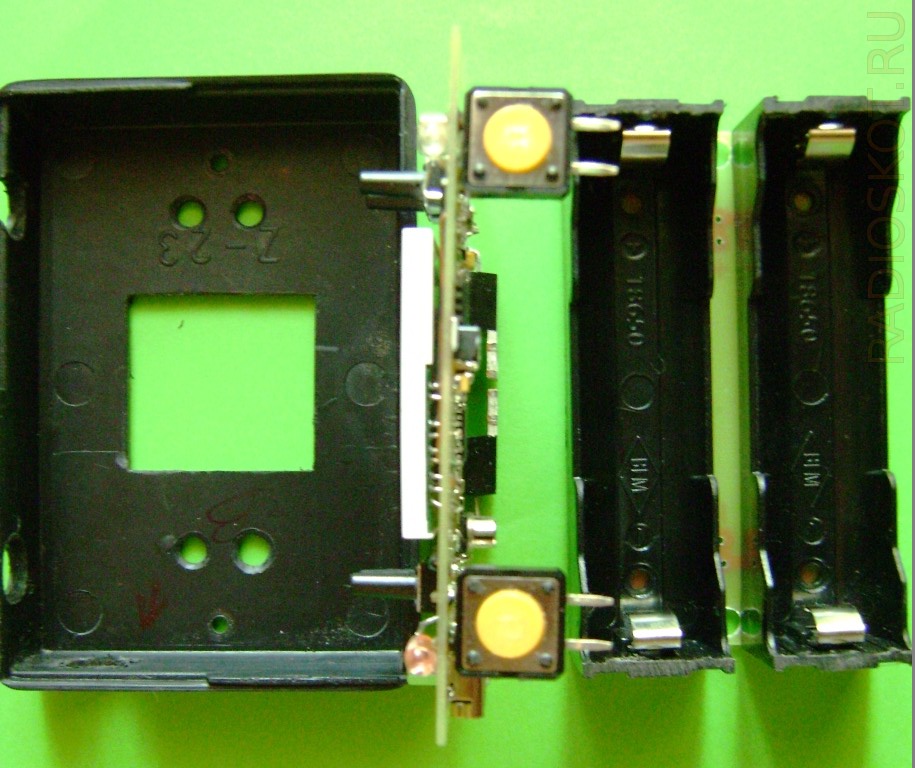
I pushed everything into the Z23 case, it barely fit, but it still fit. Since the stand was in the middle, I had to cut it down and fasten everything with a draft through the metal of the stand; later the body will be finished off externally, but for now it’s something like that. Here you can see the back of the case:

In this photo, the back half of the case is removed, there is only one battery left, you can see that there is a buzzer hanging on the wire, there is nowhere to put it - there is no place, it will be pressed between two batteries.

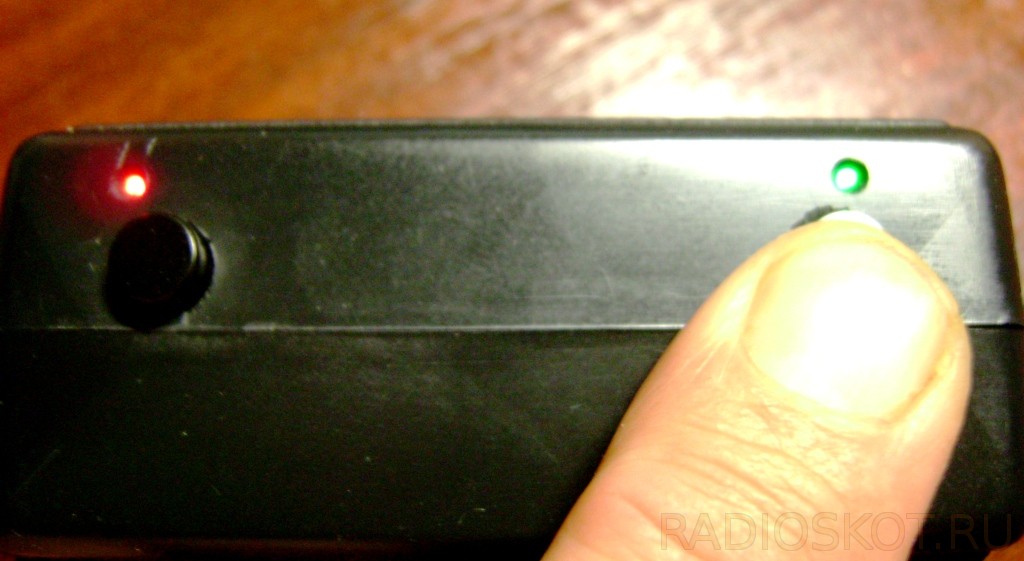
There are two buttons at the end, the left one is to turn on/off the power, the right one is to turn on the spiral. The left LED, red, indicates the battery operating mode, the right green LED lights up when the coil heats up.
This photo shows the main screen, mode control with four buttons (SET, OK, +/-).

Here is the menu of the electronic cigarette, controlled by the same buttons.
While our brothers promise to send me an atom, for now I had to attach just such a “pacifier” (which was not expensive).

Due to the lack of space in the case, it was necessary to machine an adapter from stainless steel for a drip tip with a diameter of 23 mm. And finally, a little more about management:


The device works really well, so far there is only one battery, which lasts for 3 days of intense vaping. For details on the circuit and firmware, please contact the author of this commercial project. GOVERNOR.
Discuss the article ELECTRONIC CIGARETTE WITH YOUR OWN HANDS
How to make an electronic cigarette with your own hands? Experienced vapers are often interested in the construction of electronic devices for vaping and dream of making their own unit. Making a homemade electronic cigarette is an interesting experience and an opportunity to better understand the essence of how the device works.
In addition, not everyone is ready to spend a lot of money on buying an expensive vape, so they want to assemble it on their own. Today in our article we will look at how to make the simplest electronic cigarette using available materials.
E-cigarette device
In recent years, electronic cigarettes have become rapidly gaining popularity. Some people consider this a safe alternative to smoking, some have succumbed to fashion trends, others like the process of releasing aromatic steam.
Against this background, a large selection of vapes and electronic cigarettes has appeared in stores, from very expensive models to quite budget options. However, there are always inquisitive minds asking the question “How to make an electronic cigarette at home?”, and this is what today’s article will be devoted to.
Before you try to assemble an electronic device yourself, you need to understand the device and how it works. A classic electronic cigarette most often consists of three main parts:
- battery;
- evaporator (atomizer);
- cartridge.
 The device also contains a microchip, an air pressure sensor and an LED, which gives a smoldering effect. Some advanced models have an informative display and other bells and whistles. But we are primarily interested in the basic elements that will allow us to understand the principle of vapor generation and make a simple electronic cigarette.
An electronic cigarette is somewhat similar to an inhaler. An aromatic liquid is poured into the cartridge. When inhaling, the microchip transmits a signal to the evaporator and the heating element turns on. Once on it, the liquid turns into vapor and then enters the smoker’s lungs.
The scheme is quite simple. But how to make an electronic one at home? Let's figure it out now!
Making an electronic cigarette from a flashlight
Making an electronic cigarette will be easier for a person who has experience working with electronic devices. Otherwise, you risk building a non-working prototype (at best) or a device that could explode in your hands at any moment.
If you do not know how to handle electronics, it is better to purchase a ready-made device. And if since childhood you have loved assembling and disassembling electronics, soldering, have the necessary tools, and understand the principle of operation of the device, then read our instructions and go for it!
As we have already said, the e-cigarette has three main parts - the rest can be easily excluded from the set. The battery can be a simple AA battery. And the body completely gives free rein to imagination - craftsmen use instead a simple syringe, lighters, pens, flashlight bodies and much more.
Some parts can be found in vape shops that sell spare parts for electronic devices.
So, it would be best to buy a ready-made evaporator - this element is quite difficult to make from improvised means.
Let's look at an example of how to make an electronic flashlight with your own hands. You will need:
- regular flashlight;
- You can’t make a battery for an electronic cigarette with your own hands, so it’s better to take a ready-made 18650 or 26650 standard;
- textolite;
- soldering iron and other soldering equipment;
- 510 connector (you can take it from an old device or buy it);
- microswitch;
- evaporator purchased from a store.
 Making an electronic cigarette with your own hands is not difficult, but the work will be long and painstaking. We only need the body of the flashlight, so we need to carefully disassemble it. However, other parts will also come in handy, so don’t rush to get rid of them.
We outline the glass from the flashlight on a piece of PCB and cut out a circle of the same size. You need to drill a hole in it and attach a connector, then tin the PCB. Now you can solder the connector to the PCB. The wire in the connector will need to be replaced with another, more powerful one, otherwise low-volume loads can “kill” the original wire and damage the microcircuit.
We unsolder all the LEDs from the board that remains from the flashlight. Now you need to solder a wire from the connector to the microswitch, and from it to the central contact of the board. We solder the negative terminal from the connector, respectively, to the negative contact of the board.
 All that remains is to insert this entire structure into the body of the flashlight. We make identical holes in the cover and reflector. They will be needed to insert the microswitch into the homemade body.
We place this entire structure into the lantern cover and glue it. Additionally, we fix it using the original washer. Connect the terminal with the minus sign. You can use a tire from a flashlight, and instead of a spring, insert a coin of a suitable size.
That's all! All that remains is to connect the evaporator and battery - you get a simple electronic cigarette that you can vape.
A DIY device should definitely be used with caution and kept away from children. After all, a homemade electronic cigarette may be unsafe to use.
As we have seen, creating a homemade cigarette is not the easiest job. There is no easiest way here; you need to have certain knowledge and experience. Perhaps for many it will be much easier to buy a ready-made device. But if you are confident in your abilities, try and enjoy your own creation!
In contact with
The popularity of electronic cigarettes is growing every year. Manufacturers claim that these devices help you quit smoking completely. But not all smokers can afford to buy this fashionable device, so some of them try to make an electronic device with their own hands. This process does not seem too complicated at first glance, but it requires certain knowledge and skills. You can make a vape at home using a pen or an unnecessary flashlight.
Process Features
Making a vape at home without any knowledge of electronics and mechanics is almost impossible. This process requires special attention, accuracy and perseverance.
It is worth paying attention to the quality of the materials and components used.
A homemade electronic cigarette is unlikely to have a beautiful and stylish appearance, but in terms of its design, vapes made at home are not much different from store-bought devices. You can also make your own liquid for an electronic device.
Assembly instructions
There are several ways to easily make a vape at home yourself, using various available materials:
- handle;
- paper;
- syringe;
- flashlight, etc.
The simplest option is a battery-powered device without a battery or other accessories.
For this you will need:
- insulating tape;
- cardboard;
- pliers;
- clamp;
- the wire;
- scissors;
- 4 "long-lasting" batteries;
- cartridge.

In order to make an electronic cigarette yourself, you need:
- 1. Assemble the batteries “plus” to “minus” so that the “plus” of the last battery is located at the top.
- 2. Cut a piece of wire 3 cm longer than the length of the folded batteries.
- 3. Remove the insulation from the wire by 5 cm on one side and 2.5 cm on the other. Where the wire is exposed more, it is necessary to make a spiral.
- 4. Install the clamp to the opposite end of the wire and crimp with pliers.
- 5. Connect the spiral end to the negative of the upper battery.
- 6. Secure the structure with insulating tape.
- 1. Draw and mark the length of the batteries, then bend a loop at the bottom of the wire and attach it to the bend with glue. Wrap the upper part of the resulting tube with an elastic band.
- 2. Place the batteries in the tube so that the negative wire is directed downward from the bent end.
- 3. The wire must be secured so that the “extra” piece of it sticks out of the cardboard tube.
- 4. Secure the clip with an elastic band.
The remaining batteries are installed in the same way.
The finished cartridge can be purchased at any vaping store. Some of them already have connectors.
The next step is to cut a piece of metal into a "T" shape, then bend the device around an insulated screw.
To power the electronic cigarette, you need to attach the clamp to the ring base of the cartridge, then connect the central terminal with the “plus” of the batteries.


 Brief description of the characters Heart of a Dog")


