Carpet patterns middle group. Summary of direct educational activities in artistic creativity (drawing) on the topic “Rug for cats and dogs
Abstract of GCD on decorative drawing “Carpet”.
Program content:
- Master the ability to see an object or geometric form as the basis of what is depicted;
- Build an elegant pattern using straight intersecting lines, dots, and strokes;
- Hold the brush correctly, master the technique of working with paints: carefully lower the brush into the paint, squeeze out excess paint on the edge of the jar, leave a mark on the paper;
- Express interest in the manifestation of beauty in the environment.
Material:
- Applique of carpets of different colors, but of the same shape: intersecting lines are vertical, horizontal, at the intersection there are geometric shapes: ovals, dots (small circles).
- Samples of teacher work 3-4 samples in different colors.
- Easel, gouache - red, yellow, blue, green, brushes, water containers, rags, rectangular paper of different colors.
Preliminary work:
- Examination of carpet products in kindergarten and at home.
- Practicing drawing horizontal, vertical, intersecting lines.
- Techniques of painting with a brush, gouache, cotton swab (practicing drawing with strokes, pokes).
Technology:
Health saving technologies
GCD move:
I. Educator: Look, guys, what I brought you (shows samples of carpet appliqué).
Educator: What do you think it looks like?
Children: On the carpet.
Educator: That's right, these are carpets, are they the same or different?
Children: Different, same.
Educator: See how they are similar?
Children: Patterned.
Educator: Yes, the pattern on the carpet is made using lines and stripes. How are these stripes located?
Educator: Ira, come, put your finger on the carpet, run along this strip. Where did your finger run from one edge of the sheet to the other?
Child: From left to right.
Educator: Sasha, run your finger along this line. Where did your finger go?
Child: From top to bottom.
Educator: The finger ran from left to right. Show the finger on your right hand, place it like this, run the finger from left to right (does it together with the children).
Now let your finger run from top to bottom.
Children: repeat.
Now, take a brush, place it on a sheet of paper, let the brush run across the sheet from left to right.
Children: children do the exercise.
Educator: The brush is tired of running from left to right, now it wants to run from top to bottom. Place the brush at the top of the sheet, the brush runs from top to bottom (does it together with the children).
Educator: The brush ran and ran across the sheet, but did not draw anything. Why?
Children: I ran without paint.
Educator: The brush is upset. Let's calm the brush and help it paint the carpet with paints.
Look at the beautiful colors on your tables.
Who knows what color paint?
Children: Red, blue, yellow, green.
Educator: Look how my brush picks up paint (lowers the brush into the paint carefully, squeezes out excess paint on the edge of the jar), now the brush runs across the paper (show and explanation).
She runs from left to right, that’s what a beautiful mark she left on the paper.
Now, I moved a little away from this trail and ran again (so until the end of the sheet - from top of the sheet to the bottom).
Children : repeat and depict horizontal lines.
Educator: the brush is tired. Lay her down to rest. And you and I will play with our hands.
Fizminutka:
We painted today
Our fingers are tired.
(active flexion and extension of fingers)
Let them rest a little
They will start drawing again.
(shake your hands in front of you)
Let's move our elbows away together
Let's start drawing again.
(pull your elbows back vigorously)
(2 times)
Educator: While you and I were resting, our brush also rested. And the marks on the paper dried up.
Rinse the brush well in some water, squeeze out the water on the edge of the jar, and dry the brush in a cloth.
Children: repeat.
Educator: Now we will paint the stripes from top to bottom with paint of a different color. Let's draw with me.
Children : Draw vertical lines.
Educator: This is what a beautiful carpet we have made. But something is missing from it.
Let's draw dots in these windows. We will draw them with these cotton swabs.
We dip the stick in the paint, apply it to the paper and leave a mark in the window. Let's draw a light in each window.
Children: repeat.
II. The teacher supervises the work of children, individually and in subgroups.
Educator: Don't forget to draw a light in each window.
First, draw lights at the top of the sheet, then lower, even lower.
Educator: We're done. Put the chopsticks on the table, move the leaves aside and come to me.
Let's see what beautiful carpets we have drawn.
III. Children walk around and look at the work. The carpets are beautiful, neat, bright, different in color.
Educator: Well done guys, everyone tried their best. Now that the paint is dry, let's show our work to mom and dad. Let's go wash our hands and go for a walk.
Drawing is one of the favorite types of visual activity for preschool children. At first, the child enjoys drawing colored lines, curls, and spots. By the age of 4–5, he has a desire to depict on a piece of paper what particularly impressed him. In the child’s artistic activity, there is a transition to associative drawing: in spots and scribbles, he finds the outlines of familiar objects. Mastering object drawing begins: the child draws according to his own plans. It is important for the teacher to teach children to see simple shapes in the basis of objects, select and mix colors, and ensure that the pencil and brush are held correctly. In the middle group, learning a new type of drawing begins - decorative, when preschoolers use the acquired skills in creating patterns to decorate an object, for example, a sweater.
Preparation for a class in decorative drawing in the middle group.
In the younger groups of kindergarten, children completed drawing tasks on paper blanks in the form of items of clothing (dress, scarf). Drawing was decorative in nature, but was aimed at honing the skill of working with a brush and paints: drawing straight horizontal and vertical lines along the edge of the workpiece, drawing dots within the designated contours. Direct instruction in decorative drawing begins in the middle group. The teacher introduces the children to folk crafts and highlights the features of Dymkovo, Filimonov, and Gorodets paintings. Through the study of objects created and painted by folk craftsmen, children learn to respect manual labor and see beauty in interior items, clay and wooden toys. There is a desire to create patterns yourself.
Objectives of teaching decorative drawing in the middle group:
- Sharpening technical skills. Children 4–5 years old create patterns from dots, lines, simple geometric shapes using a brush and paints or a pencil.
- Development of compositional skills. Children master the concepts of “symmetry” and “rhythm”, learn to place patterns on the surfaces of objects of different shapes.
- Development of a sense of color. The teacher teaches the children how to mix colors and use contrasting color combinations in a pattern.
- Learning the ability to distinguish between different types of folk painting and perform individual elements in your own works.
Lesson materials
For decorative drawing in the middle group, it is recommended to use figured blanks made of thick paper (for watercolor or gouache) or cardboard. Blanks in the form of dishes (cups, spoons, plates), clothes (apron, dress, sweater, mittens) or toys can be cut out in advance and stored in a closet with materials for art classes. Another option for decorative painting is to use a template. The children are given cardboard templates of a sweater; they must trace it with a pencil on a sheet of paper. In the middle group, you may not be given the task of cutting along the contour to save time, but those of the children who can quickly cope with drawing a pattern should be asked to cut out a decorated object.
Colored paper or cardboard is also used as a base. Bright material attracts children's attention and develops the ability to combine pattern and background colors.
Figured blanks for thematic classes on decorative drawing can be assigned to students at home together with their parents and brought to the next lesson for decoration with a pattern. For example, on the weekend you are given the task of preparing a piece cut out of thick paper for a lesson. "Sweater Decoration". The creative process for the guys will begin from the moment they choose the style of the sweater (wide or narrow, sleeves with or without elastic bands, a collar with a collar or a crew neck, or it is missing, and then you need to decide on the shape of the neck) and the color of the paper from which the blank will be cut. As an idea, the teacher can suggest that parents find embossed paper. It is sold in specialized craft stores, has a textured surface and will serve as a material for various crafts, including making a sweater.
This topic can be used to conduct a short-term project - “We decorate a sweater for a favorite toy”. The child chooses which toy he wants to decorate a sweater for as a gift, and the parents help draw the outlines of a suitable sweater. At home, children can try cutting out the blank themselves.
Options for templates for the “Sweater” blank.
In decorative drawing classes in the middle group, children draw with colored pencils, wax crayons, watercolors and gouache. Pupils are given freedom of choice (paints or pencils) during classes aimed at reinforcing decorative drawing techniques.
Techniques and techniques of drawing in the middle group.
Children 4–5 years old learn to hold a pencil correctly. They trace the templates along the contour, draw patterns of straight and curved lines, simple geometric shapes. In the middle group, learning pencil shading begins: painting circles and ovals with lines in one direction, without going beyond the contours.
Much attention is paid to the development of painting skills. Children consolidate their skills in working with a brush: wetting, picking up paint, mixing paints, painting with the whole bristles or the tip of the brush. Middle-aged preschoolers create a pattern using the following drawing techniques:
- Strokes. A simple decorative element that does not require extreme precision. The children create a pattern by lightly applying brush bristles to the paper. The tasks to consolidate this technique include mastering the technique of alternation: strokes of paints of different colors are applied in a certain order.
- Points. A more complex element, children must learn to paint with the tip of the brush in a vertical position. The dots are placed in a certain rhythm within the contours of the decorated workpiece. In contrast to the tasks in the younger group (“Using dots, depict snow, raindrops, berries, grains for the birds”), children are asked to draw a pattern with dots in accordance with the plan: parallel rows, a checkerboard pattern, or a dotted outline of a figure, for example, a circle. The skill of alternation is first consolidated in completing the task of drawing dots of different colors, then develops when drawing dots and strokes in a given order.
- Rings and circles. Children learned to draw these elements in younger groups. In decorative drawing classes, their implementation becomes more difficult: the children must draw circles and rings of the same size.
Initially, children learn the simplest compositional technique in creating an ornament - repetition, after which - alternation. The skill of creating a linear pattern on strips of paper or along the edges of blanks (the hem of a dress, the rim of a cup) is reinforced. Using blanks in the shape of a square or circle, children learn to determine the center of the figure, draw a pattern in a circle or with a rotation of 90 degrees.
The use of other types of visual activities and non-traditional techniques.
In decorative drawing classes, techniques from other fine arts activities - appliqué and sculpting - can be used. The image with an ornament is complemented by design with elements made of paper or plasticine. For example, paper strips can be glued to mitten-shaped blanks - these will be knitted elastic bands; the sundress blank can be decorated with an applique in the upper part - decorate the sundress bodice; you can add plasticine balls to gloves, a hat or a sweater to imitate wool pompoms; decorating the finished work with small plasticine balls - beads, beads or buttons on items of clothing and hats.
In classes on creating patterns, the following non-traditional drawing techniques can be used:
- Finger painting. Children aged 4–5 years still retain an interest in drawing with their fingertips and palms.
- Printing - creating a pattern by dipping in paint and applying pieces of foam rubber, leaves, buttons, etc. to paper.
- Pointillism is drawing with dots, usually using cotton swabs.
- Monotype is a technique of a single print. The ripples draw on one half of a symmetrical blank, without allowing the pattern to dry, fold a sheet of paper in half and get a mirror print.
- Drawing with wax crayons and watercolor filling. The children draw a pattern with a wax candle or chalk, then completely paint over the blank with watercolors (on top of the wax pattern). When the paint dries, the wax contours appear beautifully.
- Scratching is scratching a design onto dried gouache, under which there is a colored wax background.
Examples of work performed using non-traditional techniques.
Finger painting Finger painting Printing with buttons Drawing with cotton swabs Monotype Drawing with cotton swabs Finger painting Scratch paper Drawing with cotton swabs Printing
Individual tasks for decorative drawing classes.
Educational activities in kindergarten are implemented within the framework of a personality-oriented approach. This means that when conducting classes (including visual arts), the teacher must take into account the developmental characteristics of each child, their level of proficiency in certain skills, and their emotional state at a particular moment. Since practical activities in decorative drawing are aimed at achieving the goal of creating a pattern on a given surface, the main task should be accessible to all students. If a child experiences difficulties, the teacher uses the technique of individual demonstration of actions. In the middle group, it is acceptable for the child to repeat the teacher’s actions.
For those children who successfully cope with the given practical task, the teacher must provide individual assignments.
Let's consider options for individual tasks on the topic “Decorating a Sweater”:
- Use applique or sculpting elements to decorate the workpiece.
- Tint the paper blank with watercolor paint.
- Trace the shapes drawn in pencil with a felt-tip pen.
- On a separate sheet of paper, draw items of clothing similar in style to your sweater (hat, scarf, mittens).
Lesson “Decorating a Sweater” in the card index of drawing topics.
When drawing up an educational thematic plan for visual activities for the year, you need to take into account that drawing classes in the middle group are held once a week. Moreover, out of 35 lessons per year, 5–6 should be devoted to teaching decorative drawing:
- "Apron decoration."
- “We decorate the sweater.”
- “We decorate the handkerchief.”
- “We decorate the strip with flags.”
- "Gloves for kittens."
- "Dress for a doll."
The lesson “Decorating a Sweater” is recommended to strengthen the skills of drawing dots and lines, simple geometric shapes. The goal of this lesson should be to decorate the blank according to the presentation. The guys independently choose what pattern they will draw on the sweater: geometric (alternating lines and shapes in various color combinations) or thematic (they will try to create a plant or natural pattern - flowers, leaves, snowflakes).
A motivating start to the lesson on the topic “Decorating a Sweater.”
Drawing an ornament in itself may not be interesting to middle-aged preschoolers. To activate attention and encourage creative activity, first of all, it is recommended to attract the children’s personal perception of visual images and use game elements in the lesson.
Motivating material at the initial stage of the lesson.
| Material option | Use as a motivating start to a lesson |
| Visual material | The guys study pictures with sweaters. The teacher conducts conversation: What elements are the patterns made of? What techniques can you use to make similar patterns on paper (rhythmic repetition, alternation). What color combinations are presented in these sweater models? An option for visual material could be sweaters worn by the students themselves. |
| Game situation | The teacher draws the children's attention to the fact that winter is approaching, the frosty season is beginning, and the toys/dolls in their group do not have warm clothes. The children are invited to choose a toy and prepare beautiful sweaters for them as a gift. On the table in front of each student is a drawing of a girl or boy and a paper sweater. Children are invited to draw a pattern on the blank and “put” the sweater on the child from the picture so that he does not freeze while walking. If the group has paper dolls with a paper “wardrobe”, then for the lesson you can make blanks with “ears” so that the children can use the decorated sweaters in the subsequent game. |
| Surprise moments | Fox (a junior teacher or another employee in a fox costume) enters the group, greets the children and complains about the cold. The fox asks the guys to tell her what to do so that the fox cubs do not freeze while walking. When the children say that they can put warm clothes on the foxes, the little fox cries that she doesn’t know how to sew or knit. The teacher guides the children through leading questions or hints that they can draw and decorate sweaters for the foxes. There is a box on the teacher's desk. The teacher reports that the postman delivered her to the group in the morning and reads out the address (the real address of the kindergarten: city, street, house, group number). When asked what to do with the box, the children, of course, offer to open it, which the teacher does. The box contains paper blanks of sweaters of the same color and a letter from the Gnome. The teacher reads out the letter: The gnome says that in the fall his grandmother knitted sweaters for him and his many brothers, but they are all the same size and color - the gnomes confuse which sweater belongs to whom, and ask the guys for help. The teacher offers to disassemble the blanks and decorate them at their own request, so that each gnome has his own unique sweater. |
| Didactic games | Collective didactic games are held with children aged 4–5 years: tasks are not given on cards, but are presented on large pictures/posters or projected on the screen. Game options: "Find differences". You need to find the differences in two identical pictures of sweaters; the teacher immediately names their number. “Find a sweater by silhouette.” The picture shows sweaters and one shadow silhouette. “Find identical pairs.” Among the sweaters shown in the picture you need to find the same ones. “Which sweater suits who?” On the left side of the picture there are sweaters with different patterns, on the right there are characters. For example, a sweater with bows is suitable for a girl, a sweater with cars is suitable for a boy, and a sweater with carrots is suitable for a bunny. |
Drawing up notes on the topic “Decorating a Sweater.”
Purpose of the lesson: decorating a paper blank with a decorative pattern.
Objectives: strengthening the ability to draw lines, strokes/shading, dots, circles and rings, checkmarks with a brush and/or pencil; developing the ability to decorate finished work with elements of other types of visual arts (paper strips or figures, plasticine parts); development of a sense of color; development of the ability to see beauty in objects of the surrounding reality; activation of fantasy; fostering independence and initiative.
In accordance with hygiene standards, the duration of a drawing lesson in the middle group is no more than 20 minutes and consists of the following stages:
- Organizational moment 1 minute.
- Motivating start of the lesson 4-5 minutes.
- Practical work 10 minutes.
- Demonstration and discussion of finished works for 2–3 minutes.
- Summing up the lesson 1 minute.
The teacher needs to draw up a detailed plan for each lesson, followed by a mandatory analysis: whether the set goals and objectives were achieved, whether the teaching methods and techniques used were effective, how the children behaved at various stages of the lesson, difficulties and delays at any stages of the lesson and their reasons, analysis of students’ work, approximate ways to improve the conduct of classes.
Methodological development for drawing (middle group) on the topic “Decorative drawing “Decoration of a sweater”.”
Consolidating the ability to decorate a piece of clothing using familiar elements: lines, strokes, dots, rings and circles.
Decorating the workpiece with paper strips.
Development of aesthetic perception and independence.
Materials Sweater blanks made of thick paper in different colors, paper strips for decorating the neckline, cuffs and elastic.
Connection with other aspects of educational work Study of decorative patterns on garments.
Progress of the lesson Creating a problematic situation. The teacher brings a stuffed hare to the group and reads A. Barto’s poem “The Mistress Abandoned the Bunny.” The guys are informed that the bunny himself got wet in the rain, and, of course, his sweater got wet - it became colorless and the drawing was washed off. How can you help a bunny? The guys offer to re-draw the pattern on the bunny’s sweater.
Communicating the purpose of the lesson, identifying the task for practical work.
Conducting a physical education lesson “Be Attentive” to the lines of a poem about flowers.
Before the children begin the task, the teacher draws attention to the fact that there is not enough orange paint on their tables; the children remember what colors need to be mixed to get orange.
Pedagogical demonstration. The teacher invites the children to remember the elements for decorative drawing and demonstrates their implementation on the board/easel.
During practical work, the teacher monitors the process of children mixing paints on the palette, the correctness of drawing with a brush, filling the entire area of the workpiece, and the students’ posture.
The children attach the decorated sweaters to a magnetic board.
Discussion of works.
Summing up the lesson. Bunny says that the guys made bright and beautiful sweaters with interesting patterns, and thanks them for their effort and imagination.
The procedure for completing work on the topic “Decorating a sweater.”
Decorating the workpiece with paper strips.
Development of aesthetic perception and independence.
Communicating the purpose of the lesson, identifying the task for practical work.
Conducting a physical education lesson “Be Attentive” to the lines of a poem about flowers.
Before the children begin the task, the teacher draws attention to the fact that there is not enough orange paint on their tables; the children remember what colors need to be mixed to get orange.
Pedagogical demonstration. The teacher invites the children to remember the elements for decorative drawing and demonstrates their implementation on the board/easel.
During practical work, the teacher monitors the process of children mixing paints on the palette, the correctness of drawing with a brush, filling the entire area of the workpiece, and the students’ posture.
The children attach the decorated sweaters to a magnetic board.
Discussion of works.
Summing up the lesson. Bunny says that the guys made bright and beautiful sweaters with interesting patterns, and thanks them for their effort and imagination.
During the pedagogical demonstration, the teacher is recommended to show on the board or easel the drawing of the techniques named by the children, and then show an example of step-by-step drawing of a pattern on a sweater. You can look at examples of finished works on a given topic and invite the children to determine with what techniques these drawings were created and in what sequence.
Decoration with paper strips and pencil drawing.
 To decorate a sweater, paper strips are selected according to the size of the neck, cuffs, and elastic bands
  Gluing paper strips
  Draw vertical lines with a pencil
  Alternating pencil lines on a sweater
  We draw rings in the shoulder area, placing them in a semicircle
  Hatching elements
  Draw rings along the bottom edge of the sweater and cuffs, paint over them with shading
  We draw similar elements along the central transverse line of the product
Drawing patterns with a pencil and decorating with plasticine elements.
 Designing the neckline, cuffs and elastic bands with pencil lines
  Drawing zigzag lines with a pink pencil
  Drawing zigzag lines with a green pencil
  Rolling plasticine elements
  Attaching plasticine balls by flattening
 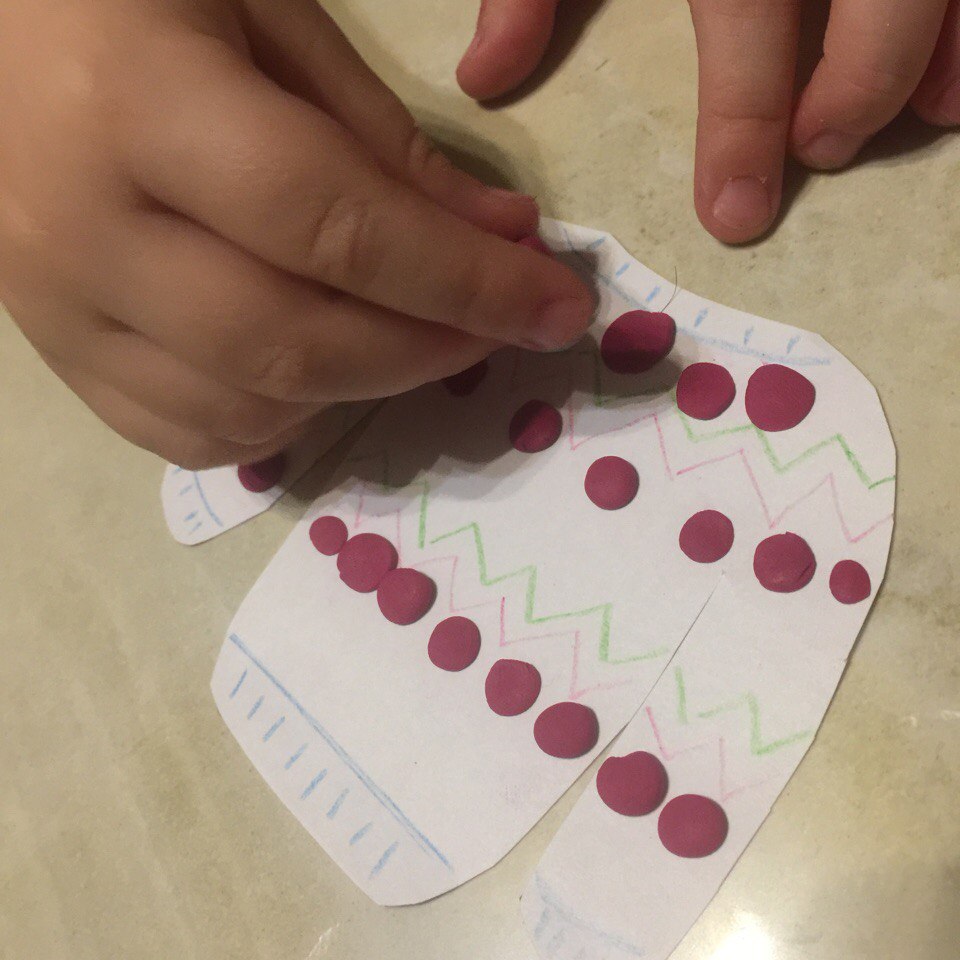 Sweater decorating process
  Finished work
Creating a pattern using a stroke.
 Applying strokes of the same color diagonally
  Applying strokes of a different color diagonally to mirror previously applied strokes
  Decoration with strokes of the neckline, cuffs, elastic bands
Drawing a pattern using lines and dots.
 Marking of neckline and cuffs with lines
  Cuff and neck design
  Drawing lines: alternating lines of different colors
  Drawing Dots: Rhythmic Repeat
Drawing with watercolors: toning, lines and rings.
 Dividing a workpiece with a horizontal line
  Toning the top of the sweater
  Tinting the bottom of the sweater and sleeves with a different color
  Drawing zigzag lines (alternating)
  Sweater neck design
  Drawing rings (alternating in a checkerboard pattern)
Drawing with gouache: circles and dots.
 Marking of neckline, cuffs, elastic with lines
  Drawing dots: alternating dots of two colors
  Drawing circles in a checkerboard pattern
  Drawing circles of a different color
  Drawing dots along the bottom edge of the sweater and sleeves
  Drawing dots of a second color
  Drawing dots in the center of circles
  Finished work
“Winter patterns”: drawing lines and dots with gouache on a colored base.
 Let's start drawing Christmas trees at the bottom of the sweater: repeating diagonal lines
  Repeat diagonal lines in mirror position
  In the middle we mark the trunks of the Christmas trees with vertical lines
  Drawing dots in a checkerboard pattern
  We design the cuffs, neckline and elastic band
  Finished work
Drawing in the middle group “Autumn carpet”
Unconventional drawing technique “Printing with leaves”
Program content:
- introduce children to a new type of visual technique - “printing with leaves”;
- develop children's imagination and creative abilities; fine motor skills of hands; sense of composition, color perception;
strengthen children’s ability to carefully use paint when working;
- cultivate interest in autumn natural phenomena, emotional responsiveness to the beauty of autumn; interest in the drawing process.
Progress of the lesson.
Organizational part.
(Children enter the group to the music.)
- Guys, look, some leaves have flown into our group with you. The leaves are not simple, autumn leaves. What color did autumn paint them?
- Yellow, red, orange.
- Guys, do you know what the autumn phenomenon is called when the leaves fall?
- Leaf fall.
(The recording contains sounds of the forest.)
- Right.
We cannot live in the world without miracles,
They meet us everywhere.
Magic, autumn and fairytale forest
He invites us to visit him.
The wind will spin to the song of the rain,
He will throw leaves at our feet.
It's such a beautiful time:
The Miracle has come to us again - Autumn.
M. Sidorova
- I suggest you fly with the leaves and the breeze.
Physical exercise “Autumn leaves”
(Children perform movements with leaves to the music.)
We are autumn leaves
They hung on trees.
The wind blew and we flew
And they sat down quietly on the ground.
The wind ran through again
And he picked up all the leaves.
Spun and flew
And they sat down quietly on the ground.
(The children sat down at the tables.)
- There are many different leaves in our autumn collection. Look at them, each leaf is always different from the other in some way: size, shape, color.
(Children look at the leaves and choose the ones they like.)
- Today we will draw autumn leaves, but in a somewhat unusual way, our leaves will help us with this - we will print with them.
2. Practical part.
1. Take any leaf you like, cover it with paint (yellow, red, etc.) using a brush, leaving no empty spaces and not forgetting to paint the edges. It is better to do this on oilcloth.
2. Place the leaf with the painted side on a clean landscape sheet and press it tightly to the paper, trying not to move it out of place, otherwise the print will be fuzzy and smeared.
3. Then take the leaf by the stem and carefully remove it from the surface of the paper sheet.
4. Take the next piece of paper, paint it a different color and print it somewhere else in the composition.
- But before we start drawing, let’s stretch our fingers.
Finger gymnastics “Autumn Leaves”
One, two, three, four, five (bend fingers, starting with thumb)
We will collect leaves (clench and unclench fists)
Birch leaves (bend fingers, starting with the thumb)
Rowan leaves,
poplar leaves,
Aspen leaves,
We will collect oak leaves,
We'll take an autumn bouquet to mom. (“walk” on the table with the middle and index fingers
fingers)
(Children work to the music of Tchaikovsky “Seasons. Autumn”) 3. Summary.
- We have a wonderful autumn meadow with beautiful leaves.
Attached files
GBOU "Gymnasium No. 1272" preschool department "Academy of Childhood"
Lesson notes
average group in non-traditional drawing
theme: “Autumn carpet”
teacher
Igosheva Irina Fedorovna
Moscow, 2015-2016
Program content:
Introduce children to drawing with gouache, using the printmaking method.Develop interest in unconventional depictions of objects (leaves) on paper.Promote interest in experimentation.Strengthen the ability to recognize and name colors.Develop fine motor skills of the hands.Form cognitive interest.Cultivate responsiveness, goodwill, accuracy, independence.Materials and equipment:
Sheets of white paper, brushes, napkin, oilcloth, leaves, paints of autumn colors, a jar - a sippy cup, a container for used leaves.Preliminary work:Observing autumn nature, looking at trees, learning poems about autumn, reading works of art. Examination of a reproduction of Levitan’s painting “Golden Autumn”, as well as sketches and illustrations depicting various trees in autumn, collecting leaves on a walk.Progress of the lesson:
Educator:Guys, please tell me what time of year it is now?Children:Autumn.Educator:What are her signs?Children:It got colder, the leaves turned yellow and began to fall off; It's raining, birds are getting ready to fly to warmer climes, animals are getting ready for winter.Educator:Do you like autumn? How? I like to walk on fallen leaves like on a golden carpet. Listen to the poem by the writer M. Iversen:The leaves are falling, fallingIt's leaf fall in our garden.Red, yellow leavesThey curl and fly in the wind.Have you ever walked around the city in autumn? Isn't it true that it is very beautiful in autumn. It’s as if a good wizard painted everything around with bright colors. Today we will become wizards and draw a magical autumn picture.Why magical? But because we will draw in an unusual way - printmaking. What it is? This is imprinting from some form, in this case from leaves, onto paper. How are we going to do this?We take oilcloth. We place our sheet on it and cover it with paint using a brush. Then we carefully place the painted side on our sheet of paper, press it with a napkin, and then carefully remove everything. (During the story, the teacher shows everything).But before we get to work, I suggest you take a little rest.Outdoor game "Autumn"We are autumn leavesWe sat on the branchesThe wind blew and they flew,We were flying, we were flyingAnd they sat down quietly on the ground.The wind came againAnd he picked up all the leaves.Spun and flewAnd they sat down on the ground again.Educator:We've rested, and now let's sit down, take the brush in our right hand and carefully get to work.
Natasha Ishchenko
Summary of drawing lesson “Beautiful striped rug”
Lesson notes in fine arts.
Application.
« Beautiful striped rug»
Educational areas: “Artistic and aesthetic development”, "Speech development", "Physical development".
Types of children's activities: gaming. Communicative, visual.
Target classes: introduce paints and brush; learn draw straight lines, hold the brush correctly when drawing; give children the opportunity to choose paint of any color; cultivate interest in drawing; practice walking and running with obstacles; improve crawling and jumping skills; cultivate interest in physical education.
Planned results: showing interest in physical exercises, the child is active when creating an individual composition in a drawing « Beautiful striped rug» , participation in observations, in exhibitions, in conversation with the teacher.
Materials and equipment: bear toy, sample drawing, watercolor paints, cups of water, brushes, napkins, album sheets.
Progress.
1. Creating a game situation.
Educator: Guys, my friend the bear has moved to a new house. And so he invited me to visit him. Do you want to come with me? (children's answer)
But on a visit, and even more so for a housewarming party, you have to bring a gift. I know what the bear dreams of beautiful rug, which he could lay on the floor or hang on the wall.
Let's give him one like this rug? (Children's response)
2. Drawing.
Look, I have a rectangular sheet of white paper, I want to make a Mat for Teddy Bear. But what would the rug turned out beautiful, it needs to be decorated with patterns. And the colorful sisters will help me with this. Here they are (showing watercolors paints) Guys, what is this?
(children's answer)
That's right, that's paints, they will help us draw our rugs. And paints have a girlfriend(Showing the brush) Who is she? (children's answer)
That's right, it's a brush paints and the brush are very friendly, but paint using a brush is not so easy, but you will definitely learn if you follow some rules.
First you need to learn how to hold a brush in your hand correctly. Then we put it in a glass of water, and only then we collect paint on a brush. If you run it across the paper, it will remain colorful trail.
I show you every action. Independent work of children.
Well, here we are with you mats and ready, now all that remains is to give them to Mishutka. But he lives in the forest and the road there is very long and difficult, so he needs to prepare for it.
3. Physical minute.
4. Outdoor game "Let's hit the road"
Well guys, now we are ready to hit the road, the road will be difficult. After all, there are so many branches, stones and other obstacles in the forest that we will have to overcome. Well, let's hit the road?
There is a high bridge on your way (gymnastic wall)
There are stones ahead of us (ribbed track)
But there are big puddles ahead (hoops, jumping)
Well, we got to Mishki. Let's give him ours rugs.
Mishutka guys really liked yours rugs, he thanks you and invites you to play and dance with him.
(Dance with a bear)
Publications on the topic:
Lesson summary “Beautiful rug for a kitten” Abstract of the OOD on the OO “Artistic and aesthetic development (Drawing) “Beautiful rug for a kitten” MKOU “Yandykovskaya Secondary School” s/p No. 1 2016-2017.
Drawing in the first junior group “Stars”. Authors of the works: Timofey Ryabtsev, Taisiya Fomina. Age of authors: 3 years Description of work: Drawing.
 Goal: To teach children to create a harmonious composition “Striped rug” from paper strips alternating in color. Continue learning.
Lesson topic: Application “Striped rug for a cat” Objectives: to teach children to create a composition from paper strips alternating in color.
Summary of OOD on artistic and aesthetic development (application) in the middle group “Beautiful Flower” Topic: Beautiful flower. Purpose: Formation.
Lesson notes on the application (collective) “Beautiful City” Lesson summary for the application “Beautiful City” (collective composition) Purpose: To develop compositional skills when creating a panorama.
Design of GCD by Anastasia Andreevna Khemerova Group: senior Topic: “Mustachioed - striped” Preschool educational institution: MBDOU “Kindergarten No. 82” combined Types.


 Brief description of the characters Heart of a Dog")


